Monday, December 30, 2013

Snowman 2


I had fun making another snowman today.
The blue background was made with a few stencils from Dyan Reaveley, paint and my Gelli Printing Plate. 
The snowman was made with my new Cameo, I love this new tool. The scarf, hat, nose were painted with Tim Holtz distress paint.
A piece of green card stock was added to brim on hat.
The eyes were made with a Copic .05 pen.
Coal was made with black card stock. 
The distress inked snow piles were made with white card stock and scissors.
 My Cameo digital tool was used to make the quote Let it Snow! 

Thursday, December 26, 2013

Mom's Snowmen

This tag is similar to the one I made and shared a few days ago, this snowman was made with card stock.
The smaller snowman was made with chipboard, both were made with my Cameo and finished by my Mother, Jo.

Tuesday, December 24, 2013

Snowman Tag


 I used acrylic paint to color this sweet little snowman image made with my new tool the Cameo.  I used Tim's #8 bookplate die and snowflake die on this tag. Distress ink was used over Hero Arts stamped image. Star bling applied to tag using Glossy Accents. 

Monday, December 23, 2013

Paper Tree

Merry Christmas and Happy New Year!

 I saw the beautiful tree from Silhouette blog  

After purchasing the image today, it took about one hour to apply petals on an 8" styrofoam cone. 


Wednesday, December 18, 2013

Thank you for visiting my blog!

I would like to take this opportunity to tell everyone that visits my blog a Merry Christmas and Happy New Year!


Tuesday, December 17, 2013

Santa Treat Box


I made these cute little Santa Treat Box to give to grandkids and great grandkids! From there, I had to make my hubby, mother, daughter and SIL, son and DIL and still have a few more to give away this week. 
They are filled with Kisses, Snickers and peanut butter cups. 
Those seen were made from red card stock.
While making these, I came up with an idea to add flocking powder on beards, brim and pompom. To do this, I swirled white glue and then added a pile of MS flocking powder, after 20 minutes the flocking was poured off and set aside to dry. One MS bottle of flocking powder was used on 25 Santa treat boxes. I've also made the Santa Treat Boxes with red plaid paper that seem to be a favorite.
The image is from SilhouetteAmerica.com
I used my new Cameo!
Finished size 5 1/4" tall. 

Love how these turned out. 

Friday, December 13, 2013

Cute Prima Dolls


I had a lot of fun making this journal page using two of those cute little girls stamped images from Prima.  I've added other stamps from my stash on the page. 


Thursday, December 12, 2013

Merry Christmas Tag 12-12-13


A stencil from my new Cameo was used with Evergreen Bough distress ink on a white tag made with a Cricut. 
Just letting you know I don't get paid to say anything about my tools/stamps/ink/die cutting tools. Just love sharing what I used on my projects! 

The tree blueprint image from Tim's CMS #135 was inked with Archival black ink on white matte card stock and heat set. I used distress markers to color tree and ornaments. Stickles were added to tree. 3D dots were used to apply stamped image to tag. 
 Mowed Lawn distress ink was used to stamp Tim's CMS #155 image, cut out and Archival black was used to stamp Merry Christmas from CMS #155 and then applied to tag. 
Distress ink was added around tag to finish.
I was making this tag last evening when one of our granddaughters came in, she saw the tag and was waiting until I finished it. She said, I want it for my tree.
Good thing I got a photo before it left my home. 


Wednesday, December 11, 2013

Season's Greetings


I used Tim's bookplate die to make a 14 pt. manila tag it was then covered with a free form holly and berries stencil I made with .005 film and my new Cameo.
Next, I used a foam applicator with peeled paint distress ink over the stencil.
With stencil still taped down add color to berries with fired brick distress paint.
Use Archival black ink to stamp image from CMS #119 Joyful Song on white tissue paper, trim and apply a thin film of Perfect Paper Adhesive (matte) and then adhere across tag.
If you like how the grid design looks on my tag, you can create it with something you may already have in your home, but you have to work quickly because the ink dries to fast. The design was made with plastic grid, I cut it the size of my tag with sharp scissors and then rubbed distress paint in Distress Paint Tarnished Brass on the grid and quickly press down on tag. You might have to practice on a scrap piece of paper before using on your tag.
Die cut one of Tim's carolers with white card stock. Paint with black soot distress stain or paint. Let dry. Apply to tag.
Stamp Season's Greetings using embossing ink followed by black embossing powder and heat set.
Use foam applicator to apply distress ink around tag to finish.


Saturday, December 7, 2013

Oh Christmas Tree, Oh Christmas Tree


I made this adorable little tree. 

Tim's rosette dies were used with MS bling on the little tree. Claudine Hellmuth matte multi-medium was used as an adhesive to hold the bling and star. I found a tiny branch on the ground for the trunk. Hot glue gun was used as Tim suggested. This was the smallest vintage spool I had in my stash. I used scrapbook paper with the rosette dies, white dabber paint to edges and glitter on the punched star.
I'm going to use the little tree in a shadow box.
I've made five of these and none of them came out perfect. Each one has it's own personality.
Tim's tree is so adorable.

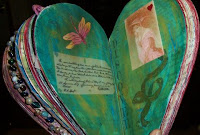
Heart Book and Memories


I've spent at least one week out of the year with my mother since I've been married. Each time through the years I would fill up the car with supplies, one time I took down candle making supplies, another time it was soap making supplies, another time was spent cleaning and painting ceramics to fire in a kiln, another time we made fabric dolls and rabbits, another time we made large outdoor cut-outs with a jigsaw. These were cut from a 4ft x 8ft piece of plywood.
Over the years we have made many crafty projects together.
 Ten years ago, I used discarded school books to make into heart book using my band saw. Mother and I spent every waking moment on our books using glue, paint, inks and stamps. Sometimes we would look at the clock, it would be 1 am. 
 We started the books on Sunday afternoon when DH left for home until he came back the following Saturday. 
 I can see a lot of improvement I could have made using techniques and supplies available today. 


Heart Book by Judy Cantrell


Do you Write with your left hand?

Do you Write with your Left Hand or your Right Hand?
Take just one minute to leave a comment, it will be fun to see if we are near the national average. The encyclopedia says that 7 to 10% of people prefer to write with their left hand. It is probably the same with stampers.

My answer:
I do most things with either hand but write best with my left hand.
When I started to grade school I was the only one in our little school left handed, they said I was going to be right handed, so during class for two years they tied my left hand behind me with a belt. 

Have a nice day!

Watercolor Card


This card was made using a stamped and watercolored image from Stampsmith and diamond stamped background from Staving Artstamps. The sentiment is unknown.

My Grandmother

This is my beloved Grandmother. When we got off the school bus we would stop in to see her and my grandpa. I have fond memories that are dear to my heart. I recall helping with the quilts that hung from the ceiling, making pulled taffy, sewing, she taught me to crochet, feeding gold fish in the pond and so, so, so many more memories. 
My Mother and Dad lived down the road from our Grandparent's. Some days it would be almost dark when I would go home. I was the middle child two older and two younger brothers and sisters.
When my grannie pass on, I was one of two grandchildren in the will; I received her treadle sewing machine. My grandparents had seven children and 22 grandchildren and many great grandchildren. 
My grandmother was a creative person, she handmade all the gifts for Christmas. I still have all the things she made me for me; even the little dress she made when I was born. 

Happy Birthday

The burlap texture fades emboss folder from Tim Holtz was used for the background of this card. The colors were created with watercolor crayons and a waterbrush. Hearts in Touch Vinca flowers were inked and colored with Copic Markers. The stamp Happy Birthday from Hearts in Touch was inked on vellum. Vellum adhesive was used to apply to card front. Home cartridge from Cricut was used to make the motif.

Stamps Happen Card


I would like to share two pages from my mini-book made with the stamps from Stamps Happen.
The first page 80164 Feather Bonnet, the second page 80426 New York Socialite
The Bind-it-All was used on this mini-book.
Artist chalks were used to color.

Friday, December 6, 2013

Celebrate the Season


I used distress ink with a stencil on the 14 pt. heavy duty manila tag, next I ran the holly embossing folder through my die cut machine, next I colored the raised images with distress inks and then used distress paint on berries. 
3D Die cuts were added to finish.  

Thursday, December 5, 2013

December 2013 Tags by Jo Adair

My mother can't wait to see what Tim shares each month, she is 88 years young and still collecting Tim's products. We spent most of one morning working on our tags a few days ago.
Since her netbook doesn't have a way to upload artwork I told her I would upload it here on my blog.
My mother used Tim's tag die to make manila tags and then completed tags using Tim's dies, stamps, distress inks, paints, embossing powder and more from her stash.
I spoke to my mother this morning, she was busy making more tags using the stamp; A Joyful Christmas
She sends out handmade tags and cards throughout the year to family and friends.


You can view Tim's 12 tags of 2013 for December here:


Update:
 My mother won on Tim Holtz blog for her 12 Tags of 2013 for December.


Wednesday, December 4, 2013

12 Tags of 2013 ~ December


Welcome to my blog; Happy Holidays and Merry Christmas!
This month I made three tags using Tim's techniques.


I made these tags using my mothers supplies of Tim's dies, stamps, embossing powder and distress inks.
I have the frosted film, its at my home 103 miles away. 
The only supplies I brought on this trip were distress paints and some stencils.  
Along with the distress painted poinsettia on second tag, I used clear film that was heated to curl in ventilated area. You know how it is, you finish a tag and have paint on your fingers and the next thing you have it on my tag. I decided leave as is. 
The first and second tag was made with the same distress paint, fired brick. The light color flower was made to look like a peppermint poinsettia. Love those distress paints.

Update:
    
I inked and embossed a few of my mother's Tim Holtz stamps on manila tags before coming home yesterday. This tag was finishing today using my supplies:
TH frosted film, TH Holly die, TH distress ink,
Archival ink; coffee, olive and sepia.
Red beads and trim inked with distress inks
Clear film
My cordless hot-glue gun was used to apply the embellishments on the tag.
This one is my favorite of the three tags! 
~~~~~~~~
Thanks Tim! 
Merry Christmas! 
Check out Tim's beautiful tags for December: http://timholtz.com/12-tags-of-2013-december/

Friday, November 29, 2013

Life, Love and Dream


My little lady is going to a fashion show all decked out in her Gelli Printed dress. I used Prima and Dylusions stamped images on this mixed media page. The frame behind the prima doll is a Tim Holtz die cut. Embellishment is from my stash. Background and die cut were painted with TH products.  Image was painted with my watercolors. 


Tuesday, November 26, 2013

12 Tags of 2013 ~ November


Well, my November 2013 tag is finally finished! 
I created my tag this month with supplies I had in my stash. The only things I had similar to what Tim used was school chalk and the saying although mine is on a stamp sheet and not a die and stamp.
I love my #155 simple sayings stamp sheet, it consist of 27 sayings and frame. 
Hop on over to see how Tim created his tag using the link below. 


Supplies I used on this tag:
Tim's CMS # 155 simple sayings
Tim's Christmas Blueprints CMS #135
Antiquities Cement embossing
Distress embossing ink
Ranger Heat it craft tool
Distress Black Paint
Tag and Bookplate die
Archival black ink
Vagabond tool
Seam binding
Chalk


Saturday, November 23, 2013

Bells with Holly Card


I loved Tim's tag so much that I wanted to see if I could make something with supplies I have in my stash. His new stencils are on my wish-list when available. 

Tim's Distress inks were used to color my stencil and a harlequin stencil.  Vines were made with Tim's Adirondack fillable pen filled with Vintage photo refill ink. Seam binding was inked with Tim's Distress Festive Berries ink pad. Tim's ideology word band and tissue tape were used. The holly stencil, bow and bells were made with my Silhouette. Bells and bow were painted with Tim's Distress paints and Distress ink. Distress Stickles were used on paper bow. I used a trimmed to fit piece of red card stock and green folded card with this tag. 

Check out Tim's tag using his Harlequin and Holly new stencils here:

Wednesday, November 20, 2013

November Tag

Finally, got a tag made but don't have the main supply Tim uses on his technique.
Here is a link to Tim's tag: http://timholtz.com/12-tags-of-2013-november/


I used distress stain on Tim's Victorian caroler die cut, and then inked and embossed using Tim's technique. 
Will try again with another tag for my 12 tags of 2013 for November. This one didn't come out as expected. 


Supplies: Tim Holtz dies, stamps, distress stain and distress inks
Other supplies from Ranger. 

Tuesday, November 19, 2013

Cameo Framed Tag


This is a Technique Tuesday tag I made for: Crafting with OWSE
Supplies:
TH ornate die as well as three of his stamps,
distress paint, distress stain, distress inks,
and
Clear UTEE by Ranger.
The background is my technique; I used 7 watercolor crayons.
For complete directions click on link above.


Saturday, November 16, 2013

Prima Doll Journal Page


I created this journal book using 140 lb watercolor paper and my Zutter tool. This is one of the pages from the journal book. I used my Prima doll and other stamped images and Eiffel Tower die cut by Tim Holtz.
Distress stain was used to color the diva's dress. 

Thursday, November 7, 2013

Mixed Media Drawing

A couple of days ago, I sat down with a sharpie pen and watercolor crayons, without looking at anything this is what I made. It's been awhile since I've done anything like this,  I'm a bit rusty.


Monday, November 4, 2013

Mixed Media (Card Front)

I've been a member with Strathmore free online classes for several years. Recently I watched their videos for artful card making techniques by Joanne Sharpe and Jan LaFazio. http://www.strathmoreartiststudio.com
If you would like to join, you have until December 31 to view the videos as many times as you want.
This is my first try from one of Joanne's techniques. 

Supplies; Winsor &Newton, portable water brush, black fine tip marker. 


Thursday, October 31, 2013

Count Down to Halloween Day 7


It's been fun sharing my tags with you over the last seven days using my Gelli Printing Plate and supplies from my stash!

The first tag was a surprise to me, I didn't like the Gelli paper until I made it into a tag.

Look below for a list of supplies I used on these tags. 


TH owl stamp, Halloween stamps from Michael's and chipboard from My Minds Eye.


The Silhouette spider die cut has glossy accents, TH dry glitter and TH distress paint and Distress markers were used on stamped book image. Oct 31 is a print and cut from my Silhouette. All stamps from EcoGreen crafts. 


Clear and UTEE were used on the TH witch, other stamps from EcoGreen Crafts, Oct.31 is a print and cut from my Silhouette. Chipboard is from My Minds Eye.


TH fence die cut with black card stock, stamps from Michael's.

Each of todays background were made with my Gelli Printing Plate on cream paper and then mounted to 14 pt manila tag.
Other supplies:
Chipboard and embellishments are from My Mind's Eye
Stamps from Tim Holtz, Recollections and EcoGreen Crafts
Glitter by Tim Holtz (Spider)
Glossy Accents by Ranger (Spider)
Distress Paint by Ranger (Spider)
On the edge die by Tim Holtz/Sizzix
Die cuts and Print and Cut by Silhouette
Stencils die cuts by Silhouette
UTEE from Ranger (Witch)
Clear Embossing by Viva LasVegas
Distress and Archival black ink by Ranger
Heat Tool by Tim Holtz
Acrylic paint

I got this idea for just one more:


This is another Gelli tag, Tim Holtz witch stamp, Silhouette die cuts and My Mind's Eye quote. Oh, and on the painted witch hat I've added Tim's new glitter, and the eyes are droplets of glossy accents followed my white and black enamel accents all from Ranger. Distress markers were used on the witch.

Well, it's been fun!! Thanks for stopping by and have a great day!
Love reading any comments about these tags and others I've shared.

Wednesday, October 30, 2013

Count Down to Halloween Day 6

A manila tag was covered with My Mind's Eye paper. The cling images and chipboard are from Michael's. Chipboard scrap was used to cover tag where the 6 x 6 inch My Mind's Eye paper didn't cover. The ink used; Archival black.
Come back tomorrow to view my last day of Halloween tags.

Tuesday, October 29, 2013

Count Down to Halloween Day 5

Day 5 Count down to Halloween # 8 tag was made with another piece of Gelli paper and a stencil made with my Silhouette.
Supplies:
Chip board and twine from My Mind's Eye
Cling stamps from Michael's
#8 tag die from Sizzix
14 pt Manila
Archival black ink
Stencil made with SIL
Gelli plate
Cream copy paper
Acrylic paint 

Monday, October 28, 2013

Count Down to Halloween Day 4

This piece was fun to make, the Gelli printed paper was made and applied to a #8 tag.
Archival black was used to ink images. Stamps and chipboard from my stash.
Come back tomorrow to view another tag on my count down to 31st of October.

Sunday, October 27, 2013

Count Down to Halloween Day 3

Day 3 tag was made with another Gelli printed paper. This paper was made on the third pull using acrylic paint, it had just enough paint to make this a one of a kind background to adhere to #8 manila tag.
Archival black ink was used to stamp images.

I'm added these tags to Simon Says Stamp Monday Challenge, "A Spooky Season."
Here is a link to view other artist artwork and all the details if you would like to join:
http://www.simonsaysstampblog.com/mondaychallenge/537/

and here for a Wednesday Challenge
Simon says ... Halloween Colors
http://www.simonsaysstampblog.com/wednesdaychallenge/

It was a fluke of luck that the green paint was on the paper and now over the house, couldn't have made it better. ... Love how it turned out. 

Once I got started, I couldn't stop making these Halloween tag.

Today, I'll share two tags.
I used a variety of stamps and chipboard from my stash over the Gelli Printed paper background. I love making Gelli paper backgrounds to use with my stamping supplies. 
This tag could easily be added to a folded card to send out. Better hurry it's almost Halloween. 


Come back to view Day 4.
 Thanks for stopping by and have a nice day.