Sunday, July 24, 2011

Quick Landscape

I finally decided today was the day I was going to use my Distress Stains. I made this piece in a few minutes. It still needed something so I got out gold dabber paint and spread it over the foreground. Then stamped the bare tree. This little landscape is 3 7/8" x 3 7/8"
Do you see a small tree on the left? I didn't notice it until it was finished.
All supplies from Ranger.

Wednesday, July 20, 2011

Grungy Monday#16 Millinery

Linda chose Grungeboard or Grungepaper products from Tim Holtz for our Grungy Monday #16.
I used grungeboard along with many of Tim's products, dies, stamps, inks, as well as Claudine Hellmuth Studio multi-medium matte on the background. This technique was used in his Christmas 2010 Day 11.

Tuesday, July 19, 2011

Steampunk Christmas

Over on Outlaw Women Scrapbook Emporium we had Christmas in July. I added this tag as my challenge piece.
Tim Holtz tree and tattered banner, MS punch and Designer paper was used on this tag. Seam binding dyed with distress reinkers and mini washers applied to tree.

Sunday, July 17, 2011

Grungy Monday Everlasting

We are celebrating another week with Tim Holtz products and techniques.


This is my Grungy Monday #15. I used supplies Tim suggest for my background. I finished my tag with a stamped image inked with StazOn on clear transparency. The advertisement on the bottom was cut from a vintage piece. Faux pearls added to wire and adhered to tag using Studio Matte as an adhesive.  Word at top stamped with Archival black ink. Seam binding was scrunched and inked with distress ink.
Distress ink
Archival ink
Mini-Attacher
Studio multi-medium Matte (adhesive)
Clear embossing powder
Staz-On
Clear transparency
Stamps: Stampsmith
Seam binding
Distress Re-inker
Simulated Pearls
Wire; 24 gauge
Vintage advertisement

Monday, July 4, 2011

GM-14 Explore

This is the 4th of July. It's been awhile since I got my GM made on Monday. Linda chose Tim's Paint Dabber Resist Technique from 2008/02/march-technique.
I was happy to see I had all the supplies for this technique in my stash.
I used Tim's cling mounted stamps as well as MM magnetic word.[explore]
Enjoy!
Note: Linda from Studio L3 no longer has a blog.

Wednesday, June 29, 2011

Grungy Monday #13 The Journey


Linda selected this week's video; http://www.rangerink.com/videos/videos_tim_alcoholinks.htm  for Grungy Monday #13.
For my GM-13 card I used two of Tim's stamps, his clock die, his distress ink, Ranger's archival black ink and Ranger's Alcohol inks.
The inside of the clock was alcohol inked and stamped with bird image.
The clock die was cut with a piece of heavy duty file folder. The file folder was so dense that I had to run the clock die through the Vagabond machine four times. Isn't the color on the clock gorgeous. You might not can tell but the die cut has a marble finish. All I did was add a little bit of distress ink to the edges using brushed corduroy. The clock hands were distress with the brushed corduroy as well.
I used 3-D Zots to apply the clock to the base of card. Finished card: 4 5/8" x 6"
My daughter has an antique shop in Arkansas City, KS; she deals in antiques and vintage. From a recent auction she gave me a bundle of heavy duty file folders to use with my die cuts.
 I'm a happy camper with all these new things to play with.

Friday, June 24, 2011

GM-12 Live the Life

 Linda chose one of Tim Holtz's April 2008 challenge for this week's Grungy Monday #12.
For this challenge I used Tim's clear stamp, a cling mount stamp, tissue tape, grungeboard arrow from package, distress stain, archival ink, aqua dabber paint, flower die, magnetic ticket die, tiny tag die and #8 Tim's tag.
Tiny brads from Paper Studio
VersaMark stamp pad
Fibers, embossing powder and black safety pins from my stash
Paper from K & Co.
GM-12 Judy Cantrell

Saturday, June 18, 2011

GM-11 Enjoy the Journey

Enjoy the journey! GM-11 by Judy Cantrell
I love this texture fades embossing folder by Tim Holtz.
I used two stamps from Tim Holtz, embossing powder, distress inks and archival inks. 
 Studio L 3 had details and other bloggers artwork each week. Linda had all the details for Grungy Monday.

Friday, June 17, 2011

Button Tag

A border of ribbon was applied around the dusty concord distress stain tag. To further distress; I used Tim's mini sander.
Stamped image was inked on glossy cardstock with archival sepia ink and watercolor with watercolor crayons, adhere to black matte and then applied to tag.
The word perfection was inked to my new die cut and distress edges using (wild honey) distress ink.
The cuttlebug butterfly was cut with grungeboard and stained with distress wild honey distress stain. Bling was added to the body of the butterfly. Buttons were added to the base of the tag and on mini-rosette flower die cut. Fibers added to finish.
Little girl: hearts in touch
word stamp: unavailable
Die cuts: Sizzix/Tim Holtz
Distress Stain: Ranger/Tim Holtz
Distress ink: Ranger/Tim Holtz
Archival Sepia: Ranger
Buttons and ribbon from my flea market stash 

Friday, June 10, 2011

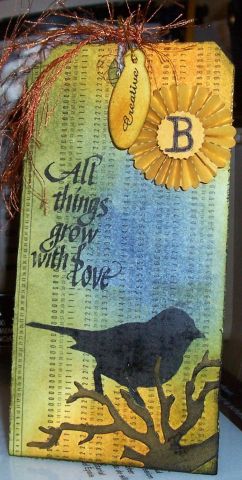
Grungy Monday 10


Here is my Grungy Monday 10 using Tim Holtz distress ink; this was a fun tag to make using many of his new dies along with stamp from my stash. A while back I shared a tag using a time card, here is another tag using a time card; although this one is solid with no holes. I love using these cards with my tag die and stamping supplies. I used a total of 7 dies with this tag.
The distress inks used on tag were Forest Moss, Wild Honey and Blue Sapphire. Archival Black on stamped images.
The bird was inked with black archival using a fun foam stamp made from Tim's die.
The mini rosette was made with gold envelope and then added a B from the new typeset die.
The little word tag on top is from a new die tiny tabs and tag
The twigs from his new on the edge
 The tag die from Tim's tag and bookplates die.
And to make it stand I added the easel. I love my easel die; it's perfect for displaying tags.
Linda from Studio L3 has all the details to join in each week.
Have aa nice day!!

Monday, May 30, 2011

Grungy Monday 09


I missed out on Grungy Monday 08; I'll try to get it made in a few days.
On this tag I followed Tim Holtz technique but changed the dabber colors.

This was my first time to use this technique and these stamps from Tim's Wild West CMS-109.
Ink and dabber paint from Ranger.

Saturday, May 21, 2011

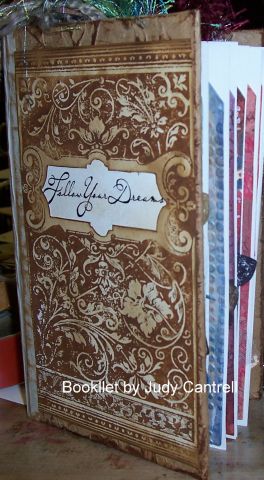
Follow Your Dreams

This booklet was made using supplies I had in my stash. It has 12 pages to display my altered tags.
Measures 4 1/8" x 7"
Have a nice day!!
Update September 13, 2011; I made a tutorial sharing how I made this booklet.

Tuesday, May 17, 2011

Grungy Monday


 Linda posted one of Tim Holtz  technique "Distress Color Ink Blocking" as our Grungy Monday challenge.
For my challenge I used a variety of Distress Inks over my tag using a foam applicator. Over that I inked one of Tim Holtz "Papillon" images using Ranger Clear Resist and a Perfect Pearls; Blue Smoke. I inked the butterflies with black ink. Fibers from my stash was added to tag.
The tag has lots of sheen that is not seen in the photo.
Have a nice day!

Friday, May 13, 2011

Grungy Monday 06, Imagine

Linda posted has all the details on her blog for this weeks Grungy Monday challenge from Tim's 12 tags of Christmas 2007, Day 8. I used the paint dabbers I had on hand for the background of this tag.
The supplies I used on this tag: Tim's cage, bird and tag dies, paint dabbers, alcohol inks, idea-olody parts, distress inks, foam with applicator and mini stapler.
I discovered by accident the beautiful colors on this cage. It's a combination of alcohol inks and dabber paints.

Non Tim's Supplies:
Viva Gold paint was used on the Philsolopy tag, fibers, beads and supplies on the bird cage.
Note: Linda no longer has a blog. 

Thursday, April 28, 2011

GM-5 Art is a Shadow


 Linda posted us to use this technique: https://timholtz.com techniques for Grungy Monday.

"Art is a  Shadow of what a person is thinking" is what the stamped image says inside the ornate plate.
I have included one of the technique I have come up with on this tag. I started out doing this technique on ATC over the last week.. This is my first tag using Artists' Oil Crayons with Adirondack Pearl Dabber Paint.
Here is the first step in making this tag:                                

Apply two colors of Artists' Neopastel Oil Crayons on tag. After applying crayons, place a tissue on your finger and rub the colors to a smooth finish, and then add a thin layer of Adirondack Metallic Pearl Dabber over the oil pastel crayons. Let dry. Ink script from Tim's Papillon stamp with Archival black ink. Important: heat set to dry.
Cut opening into foam and tag front using ruler and craft knife. Adhere tag to foam die cut. Adhere another die cut tag to foam as a backing to adhere butterfly. Die cut butterfly with grungeboard and then paint with black dabber paint.  Adhere butterfly with Studio multi-medium matte to base of square opening.
Stamp script with Archival black ink and adhere behind Ornate plate with Studio multi-medium matte as an adhesive. Set ornate plate to front on tag with brads. Add fibers.
 .                                    
Tag by Judy Cantrell

Thank you for stopping by my blog!! Have a Nice Day!!

Sunday, April 24, 2011

Oil Crayons with Pearl ATC

The background portion of this tag was made using Artists' Grade Oil Crayons. Apply two to three oil crayons to cover on smooth finish cardstock and then take a tissue and rub to a smooth finish. Next add Pearl paint over the oil crayons. Let dry. Use Archival black ink to stamp image. Heat set to dry.
Retired stamps by Hearts in Touch
Oil Crayons: Caran D'Ache Artists' Colours Neopastel Oil Crayons
Pearl Paint: Adirondack Metallic Dabber
This photo does not do the finish justice. It's beautiful in real life.

ATC by Judy Cantrell

Saturday, April 23, 2011

Altered Ribbon Spool Challenge


Altered Box by Judy Cantrell

This is an Altered Ribbon Spool I made for a challenge on Outlaw Women Scrapbook Emporium.
The flower was made using TH tattered floral die and Mr. Coffee filters, the leaf die from Quikutz and the box from an empty ribbon spool covered with scrapbook paper. It's just a little over 3 inches wide.

Friday, April 22, 2011

GM-4 Journey

I'm getting a late start on Grungy Monday this week from Linda's challenge.  This week we are using Tim Holtz's Texture Fades and Distress. This is a link although we are not doing 12 days of Christmas: http://www.youtube.com/user/timholtz#p/u/11/1bLxWrIbE3I
I used three of Tim Holtz stamp sets on this tag, CMS 100, CMS 106, CMS 111, a Texture Fades, Townscape on the edge die, Tag die, Vagabond, Distress ink; Stormy Sky and Frayed Burlap, Archival black ink, Tim's distress tool, ink applicator and Stickles clear rock candy.
GM-4 By Judy Cantrell

Wednesday, April 13, 2011

Grundy Monday #3

We celebrate Tim Holtz style by sharing a challenge each week. This week we are using Ranger Adirondack Color Wash. This week Robyn from Outlaw Woman Scrapbook Emporium is the sponsor.

The tag was made using the challenge product sprayed over the bodice of the dress form, inked with Archival black and stamped with script over the Cranberry Color Wash. Inkssentials Enamel Accents black was used on top and base of dress form die cut. To add reinforcement another tag was adhered to back of tag using Zip Dry. Foam pad applicator was used with Distress worn lipstick around edges of tag. Net tooling was gathered to waist of dress form using Zip Dry. Ribbon was wrapped and tied to waist.  The dress form die cut was adhered to scrapbook paper. Sentiment was inked with Ranger's Archival black and then highlighted with Distress tattered rose. Elastic was sprayed with a mixture of reinker, perfect pearls and applied to tag.
I looked around my stash and couldn't find anything to add to this tag. So I'm playing it safe this week with the motto: less is more.
Supplies used on this tag:
Stamps: Dawn houser by Inkadinkado
Archival ink: Ranger
Distress inks: Tim Holtz
Inkssentails Enamel accents: Ranger
Scrapbook paper: K and Co.
Ribbon and Elastic:  Hobby Lobby
Tag and Dress Form:Sizzix/Tim Holtz
Foam applicator: Ranger
Perfect Pearls: Ranger
Zip Dry Paper Glue: Hobby Lobby

Thursday, April 7, 2011

Grungy Monday 2

Linda is celebrating Tim's style by sharing a challenge each week. This week we are doing a virtual tour from https://rangerink.com website. 

Tim's stamps, die cut tag, die cut scrollwork, die cut bird from electronic machine, distress inks, archival ink. Can you guess what the base of the tag is made from? We were cleaning out Mil's house after she passed away I found a small stack of time sheet cards. Some have punched holes others have no holes.

Wednesday, April 6, 2011

Dress Form


I made this tag using Tim's new dress form die. I used corragated cardboard that had a slick finish on the outside, I pulled the slick finish off and kept some of the white paper beneath to add texture to the die cut tag. The tag was inked with a variety of distress inks. And then added clear rock candy distress stickles to paper side of tag. I cut one white matte coat dress form and one grey dress form from cardboard. I rubbed Viva Inka-Gold on base and top of dress form. The white dress form piece was cut and then inked with distress stains and distress inks. I added Tim's paper tape to waist. I added a variety of Ranger products to button until I got the color I liked. Mini-brads were used to attach the button to the tag. A piece of real pattern was applied to tag. The spool of thread was cut with cardboard and left the natural color. I added thread and needle to the spool. I used mini-mister bottle of perfect pearls and distress ink spray on elastic for ribbon.
Lots of Ranger and Tim Holtz products were used on ths tag.

Thursday, March 31, 2011

Grungy Monday #01 Fly

It's finally here; sharing my tag using the techniques for the first Grunge Monday from Studio L3 and inspired by Tim Holtz http://www.timholtz.com/
Here is my challenge using the techniques from 2008 12 Days of Christmas but making it my own.

I went over the 200 characters in labels and didn't get to add all the supplies.
Black Embossing powder and heat  tool was used on bird. The townscape image was made using a mask from that die.


Friday, March 25, 2011

Fairy Song Tin Clock & Fairy Album Tin w/Copper Mesh

My stamped and tin projects was published on Rubber Road Adventures: http://rubberroadadventures.ning.com/
I used Fairy Song Art Stamps on both projects. http://www.faeriesong.com/artstamps/
This is a direct link for both projects with step by step instructions:
http://rubberroadadventures.ning.com/page/faerie-song-tin-clock
http://rubberroadadventures.ning.com/page/fairy-album-tin-with-copper
I hope you enjoy viewing each project.

 Below are samples of my projects. Click on link above to see complete instructions for both projects.
                                                                  

                                                                      Portion of tin clock
Inside portion of tin project

Thursday, March 24, 2011

Altered Tin Projects and More

These are some of my projects published on RRA, although the online magazine that closed.
The first project: http://rubberroadadventures.ning.com/page/love-spiral-booklet
Second project:: http://rubberroadadventures.ning.com/page/faerie-song-tin-clock
Thrid project:: http://rubberroadadventures.ning.com/page/fairy-album-tin-with-copper
And a card: http://rubberroadadventures.ning.com/page/dear-heart-card
I have a supply list with complete instructions on my projects.
I hope you enjoy viewing these projects.

Monday, March 21, 2011

My Grandparents

This is a card to share on my blog today. The photo of my grandparents was made with an image transfer on mica. The letter is a copy from grandfather to my grandmother. And a copy of their marriage licenses. Key and heart from my stash of supplies.
I love to use my family photos with my projects. My grandparents had this photo made around their first anniversary; they sold a bedroom suite with marble top in exchange for this photo.