Tuesday, November 23, 2010

Distress

I created this page using distress inks, Tim Holtz stamps, tape, perfect pearls mist, masks, flower die cut, stickles and more.
This page was made using a technique from Compendium of Curiosities page 61.

Wednesday, November 17, 2010

CCC#21 Update

 Monday morning over on Studio L3 my card was posted as a winner (43) using the Perfect Distress Technique; I received $25.00 shopping spree from Simon Says Stamp.
Thank you Linda (Studio L3) and Steph from Simon Says Stamp.

Wednesday morning my card was a randomly drawn number (28) to win $25.00 shopping spree donated by site sponsor Simon Says Stamp. The Challenge; use your Favorite Tim Holtz Stamp.


Tuesday, November 16, 2010

CCC#22 Alcohol Ink Splatter

 Tim says, know when to say when. Well, I think this one went over the when stage. Although, the outcome of the technique pleased me.
Linda over on StudioL3 will give you all the details if you would like to join.
Tim Holtz stamps, alterations die cut and alcohol inks were used on this challenge.
This is a page that will fit in my booklet started a few challenges back.

Friday, November 12, 2010

CCC# 8

I'm playing catch-up here is my CCC #8 using grungeboard die cut, Ranger inks and Tim's stamps. This technique is on page 39 "Inking Grunge."

Thursday, November 11, 2010

CCC#21 Perfect Distress


This week it is all about Perfect Distress on page 38 from the book A Compendium of Curiosities.
This is my challenge using a variety of supplies from Ranger along with Tim's rubber stamps. Die cut from Sizzix.


Friday, November 5, 2010

CCC#20 Industrial Grunge

I used the technique on page 54 for A Compendium of  Curiosities Challenge: Industrial Grunge.
I enjoyed using these cute little photo type stamp and watercolor images with Ranger supplies and Sizzix dies from my stash.

Thursday, October 28, 2010

CCC#19 Extreme Masking

CCC#19
This is week #19 with Compendium of Curiosities Challenge, it was fun creating this challenge using techniques on page 61.

Another page fills my booklet started only a week ago. It's coming along nicely with techniques I missed.  

Supplies used on this page; forest moss, aged mahogany, dusty concord and scattered straw distress inks, archival ink, alcohol inks, stamps from stamper anonymous, tim holtz alterations movers & shapers dies: oramental, tattered florals, idea-ology mask, shrink plastic, distress stickles, white cardstock and tim's ink applicators.

Tuesday, October 26, 2010

Journal Book Cover

This journal started out as a piece of white fabric. I made images from my stamped cards with fabric transfers, next I sewed the transfers onto the cover and then added embellishments and distress the fabric with Distress Inks. Inside is a fabric liner to hold a composition booklet. I satin-stitched the edges with my sewing machine.
Note: All stamps are from my stash of stamps.
Top left; woman image and background images-Viva Las Vegastamps,
Bottom left; woman image-Stampsmith (no longer in business), background- Mrs. Oleary's,
Bottom right; woman image- Stampsmith (no longer in business), background stamps Above the Mark (no longer in business)
Word Stamp; Stamper Anonymous.
Inks: Distress Ink
Sewing Machine: Bernia
Fabric: White Canvas

Friday, October 22, 2010

CCC#18 Dabber Resist


This weeks Compendium of Curiosities is on page 37, you'll find Tim's Dabber Resist Technique. My challenge piece includes Ranger products, Tim's paper tape, Tim's Tattered Element stamp and an Alterations movers and shapers die cut.
Other supplies include my Bind-it-All, Spellbinder die, Art Neko stamped image, Archival black ink, Dabber paint, Distress ink and a metal button inked with Adirondack alcohol ink.

I've missed many of the previous challenges. I got an idea to use the Ornamental die by trimming off a portion to fit in my BIA for a booklet. When finished the booklet will include all of the challenges.

Wednesday, October 20, 2010

Fall Cards


Enjoyed making these with craft items, fabric, paper, punches, and die cuts.

Friday, October 15, 2010

CCC#17


This is my example for #17 Fragment Charms Challege. You will find this technique on page 64.

Friday, October 8, 2010

Music

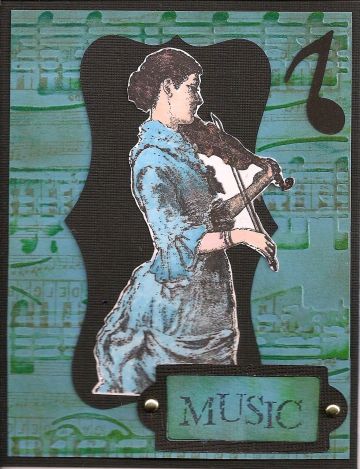
This card was created with an CB embossing folder, die cuts from Quikutz and Sizzix. The woman playing and quote are stamps from IBFS.

Tuesday, October 5, 2010

CCC#16 Wrinkle Free Distress


This challenge is sponsored by Amazing Daisy of Eclectric Paperie.
I made two tags using Tim's instructions on page 33 from Compendium of Curiosities. After completing the background, I used Tim's EZ-Mount stamps along with some of my Silhouette die cuts. The second tag I used Tim's Visual Artistry Clear Stamps Set with Stickles on the butterfly.
Update: Linda from Studio L3 has closed her website. 

Friday, September 24, 2010

Alcohol Ink Agate on Grunge CCC#15

This week's challenge is sponsered by Simon Says Stamps  This challenge piece was made using the technique from page 53 of Tim's Compendium of Curiosities; "Alcohol Ink Agate on Grunge." I also used an Ornamental Alterations die, Grungepaper, Distress Stickles, Tim's Swivel Clasps, Adirondack Acrylic Dabber, Archival Black, Tim's ez-mount stamps as well as other stamps, dies and supplies.

Tuesday, September 14, 2010

CCC#13 Grunge Flowers with Bird

I made this card using the technique found on page 65 from Tim Holtz's "A Compendium of Curiosities"
I had this card made for CCC#13.

Sunday, August 29, 2010

CCC#11


I used the tech from page 36 in Tim's new book. Stampsmith images were used on this tag. Colors used on stamp: Copic Markers, watercolor crayons and distress ink.

Thursday, August 5, 2010

First Watercolor


While recouping from knee surgery this week, I played around with real watercolors and a paint brush. I spent 6 days with my mother, she lives close to the surgeon. My mother gave me a lesson in watercolor, she added that I was using too much color.
I guess I'll never be a watercolorist but had fun making this piece.
I've been to Therapy four times, learning how to walk with crutches.

(This watercolor was done freehand with out a pattern or stamping)

Wednesday, August 4, 2010

Collage Card


I made this card awhile back using Pam Bell stamps from OnyxXpressions, Time to Stamp images from IBFS and Above the Mark stamps. The stickers are from Starform (Netherlands) and die-cuts from my Cricut.

Saturday, March 27, 2010

Fairy Album

Artwork by Judy
Rubber Road Adventures presents: Metal Art with Fairie Art Song Images.


I had a lot of fun creating this little tin to share with you.

Supplies:

Faerie Song Art Stamps: Sarah FS-1033, Kyra FSVW-2K, Bryony FSVW-2B, Heart Flowers FSVW-3HF, Butterfly Trio FS-8bt
Memento rich cocoa die ink (Tsukineko)
Nestabilities Dies (Spellbinders)
Wizard tool (Spellbinders)
Watercolor crayons (Lyra)
Portable waterbrush (Niji)
Swirl glitter glue (Sulyn)
White cardstock, medium green cardstock
Tacky tape (Art Accents)
Create-a-sticker (Xyron)
Black gesso (Liquitex)
Craft brush
Bone folder (Martha Stewart)
Copper mesh (Amaco)
Stained glass foiling tape (Diamond Tech)
Lumiere metallic bronze (Jacquard)
Precision blade scissors (Dyno Merchandise)
Craft scissors
Size G crochet hook (Boye)
Stonewash cotton ribbon (Susan Bates)

Instructions:
1. Place newsprint down on work table, paint tin with black gesso. Allow to dry.
2. Paint front of tin with metallic paint. Allow to dry.
3a. Trim copper mesh with craft scissors to fit front of tin. Apply an even amount of foiling tape around edges of mesh, fold remaing tape to back, use bone folder to smooth foiling tape on both sides.
3b. Apply narrow tacky tape to back of foiling tape. Peel off liner and adhere to cover. Set aside.
4. Stamp "Sarah" with rich cocoa ink on white cardstock. Set aside to dry.
5. Watercolor Sarah, let dry, use precision scissors to trim close, remove all white area from image. Apply glitter glue to wings and flowers.
6. Stamp the :Butterfly Trio" on white cardstock, watercolor one of the butterflies, cut-out and adhere to copper mesh. Add glitter glue to butterfly.
---
Inside of Tin: Crochet two chains, long enough to cover around the inside of tin with stonewash cotton ribbon. The cover lid with be a little bit longer. Tie off each chain. Set aside.

1. Stamp "Heart Flowers"on smooth white paper. Paint the heart flowers with watercolor crayons. Trim and adhere each piece to fit inside of tin.
2. Adjust to fit each crochet ribbon chain over the stamped flowers as a frame. Adhere with clear drying glue. Set aside to dry.
3. Stamp Kyra and Bryony on smooth white cardstock with rich cocoa ink. Heat set to dry.
4. Watercolor both images with the waterbrush. Let dry.
5. Use one of the smaller dies to fit the painted fairies. Use die cutting tool to cut image and then emboss. Set aside.
6. Apply glitter glue to wings and hearts on Kyra and wings to Bryony. Let dry.
7. Use larger die cut to frame fairies with olive green cardstock.
8. Apply adhesive to finished die cuts and then adhere to background of "Heart Flowers" to finish.
The hop starts at Etha's Fairies Tin , and then my blog, next blog hop to Peggie's Music Box from there hop over to Cindy's About a Girl
I have another tutorial below using Faerie Song images: Decorative Clock


Faeries Song Decorative Clock


Rubber Road Adventures presents: Metal Art with Fairie Art Song images.

The moment I saw this tin purse at my craft store I knew it would be perfect for this clock and the stamped images. I had a lot of fun creating this project to share with you. Click on close-up view to see the details of these beautiful stamped images.
Supplies:

Kyra FSVW-2K ,Bryony FSVW-2B, Mushroom Trio FSVW-1MT, Heart Flowers FSVW-3HF,
Butterfly Trio FS-8bt, Daisy Face FS-9d1
Watercolor crayons
Twinkling H20's (LuminArt, Inc)
Memento dye ink: Rich Cocoa (Tsukineko)
StazOn solvent ink (Tsukineko): Timber Brown
Swirl Glitter Glue: Berry, Sydney's Best (Sulyn)
Big Glitz GLitter Glue: Sparkling Ice (Sulyn)
Decorative Tin
1/4" Clock Work Kit
White cardstock
Small Precision Scissors
5/16" bit with drill
Wire cutting tool (Fiskars)
Ruler
Portable waterbrush (Niji)
Millennium pigment pen 01mm (Zig)
Unbleached Titanium Gesso (Liquitex)
Create-a-sticker (Xyron)
Craft foam brush
Mist water sprayer
No. 6 Scheewe round brush
Sandpaper
Instructions:

Mark center of tin. Fill tin with old telephone books to give a rigid area for drilling. Drill a 5/16" hole in center of tin. Remove books before proceeding. Sand tin. Remove any burs from the drilled hole with wire tool. Apply three coats of unbleached titanium gesso on the tin. Allow drying time between coats.

Stamp "Heart Flowers" with timber brown across the bottom of tin and "Butterfly Trio" twice on the top of tin. Allow to dry before proceeding.

Activate H20's with a fine mist of water, use watercolor brush to color "Buterfly Trio" and "Heart Flowers". When dry, add glitter glues to butterflies and heart flower tops.

Stamp an extra butterfly with rich cocoa on white cardstock, color with H20's, let dry. Add glitter glue to butterfly, dry, cut out and adhere to tin. Add antennas to the butterfly with black pigment pen.

Stamp and watercolor "Daisy" on white cardstock. Cut-out and adhere flower to handle. Apply glitter glue to daisy.

Stamp "Kyra" and Bryony" with rich cocoa ink. Let dry completely. Watercolor both images, cut away all white areas with sharp scissors, and then adhere to the tin.

Add glitter glue to wings of both fairies.

Add glitter glue to hearts on the "Kyra" fairy.
Stamp one of the "Mushroom" on white cardstock. Paint with H20's. Cut out and then adhere next to "Bryony" fairy. Appply glitter glue on mushroom.

Add battery to clock works; instructions will be on the package.
The Blog Hop continues view everyone's Faerie Song tutorials:

Etha's Fairies Tin
Peggie's Music Box
Cindy's About a Girl
Check back often for more artwork for Fairie Song Blog Hop.


Monday, March 15, 2010

Domino Art

I shared this piece over on Club Posh this past week.
The Flapper image from Stampsmith was inked on a vintage domino. Watecolor crayons were used to color the image. The polymer clay background is also a Stampsmith image from the stamp sheet Cartolina Postale.

Thursday, February 11, 2010

Winter Snow


This card fits right in with so many of the USA getting snow right now. We have had our share since Christmas Eve.

The card front was made with an embossed folder and then the center oval cut-out. Line Starform stickers added to the oval. The Stamped Happen winter image was inked, watercolored and adhered to back of card. To finish I added glitter to house, smoke stack and child.

Sunday, February 7, 2010

Thinking of You


I made this card to send to my mother. She had hip surgery this past Tuesday.
Black ink pad was used to stamp the flower image on heavy watercolor paper. Watercolors and glitter glue was used to color the flower. The background was made using a variety of ink pads and stamps.

Friday, January 1, 2010

Music Card


This card was made for Die Cut Diner while I was a designer  for RRA. The chevron design is from Terryfic Times.
Stamped image unknown.