Saturday, November 26, 2011

Turkey Two

This is my second turkey. I placed the rosettes in my Color Catcher and
sprayed them with Walnut Ink Antique Solution by Tsukineko. 
The head of the turkey was made with designer paper and then inked with distress inks.
The orange portion of the turkey was made with orange file folders. Hot glue gun was used to adhere the piece together.

I got my instructions and download body from Tim Holtz blog for his Quirky Turkey:
http://timholtz.typepad.com/my_weblog/2011/11/quirky-turkeys

Tuesday, November 22, 2011

Rosette Turkey

Today on Tim Holtz blog http://timholtz.typepad.com/my_weblog/ he is sharing how he made a turkey using both of his rosette dies.

Here is my turkey using his instructions.
I used designer paper from K and Company for my turkey along with Tim Holtz products and die cuts.

Thursday, November 17, 2011

Update on Resist Technique

 
The Ornaments and Merry Christmas were made with
the same technique I shared on Technique Tuesday November 15.
Here is the tutorial:

 I used designer paper with clear embossing ink and powder with

Walnut ink. The pieces were cut-out and placed over
a tag I sprayed with Tattered Angels Glimmer Mist (Patina)

Stormy Sky distress ink around the outside edges.

Wednesday, November 16, 2011

More Inks and Stamps

This is tag I made over this past weekend. I used Tim Holtz Christmas Memories stamp set with. Festive Berries and Everygreen Bough ink pads.
A time card from my stash was made with Tim Holtz die and bookplate.

Tuesday, November 15, 2011

Resist with Walnut Ink

I made this card for OWSE blog: http://craftingwithowse.blogspot.com/

Snowman

I got a new texture fade Christmas embossing folder set in the mail yesterday. Here is a tag I made using one of the strips from the embossing folder with a snowman die cut and snowflake. A variety of distress inks and dabber paints were used on the tag.

Monday, November 14, 2011

New Inks and Stamps

I had a fabulous time with my mother over the week-end. We used some of our new inks and stamps. We went to Michaels and found a good buy. They had Christmas stamps; cling and mounted half price plus -25% off. We bought a few Hero Arts, Stampendous and Recollections stamps. We each made five new Christmas cards. I'll share those in the coming weeks.

This is one of the tags I made over the weekend.
This tag was made using Tim Holtz new Christmas stamps along with one of his new ink pads.(Iced Spruce.) The two stamped images on the tag was inked and clear embossed. The angel was cut-out and added with foam dots. I used the new Festive Berries to color the seam binding tie. Love the crackle stamp from this set!


Monday, November 7, 2011

Grungy Monday #26


I made a mask using TH idealogy mask sheet and then inked Tim's airplane with blue StazOn ink. Next I used white dabber on a TH stamps, heat set and then inked another TH stamp over the entire tag with black soot. With the mask on I added two of Tim's distress inks to color the tag.
Tim added embossing ink and powder to his tag. I didn't think this one needed that.
And then I added my finishing touches;
Inked the "enjoy the journey" and bird on the fence with black Stazon.
Inked, stamped, and cut out one of Tim's clocks, punched a hole in the center and then added the spinner pointing at the airplane.
Seam binding added to top.

Sunday, October 30, 2011

Grungy Monday 24


 I chose "Perfect Distress" for our Grungy Monday #24 

The die cut page, stamp and supplies for perfect distress was made from my stash of Tim Holtz products.
I used inks from new fall seasonal ink pads on the seasonal reflections cling stamps.
The black die cut images are from my Silhouette digital craft cutter.
This is one of those techniques that looks best in real life. The scanner doesn't show the sheen from the perfect distress.

Tuesday, October 25, 2011

Dress Form Collage

 We were with my Mother over the week-end. We spent some of our time at her table having fun with our stamps, Tim Holtz die cuts, stamping supplies and my original Silhouette machine.

The base of this piece was made gluing 2 pieces of cardboard and a piece of card stock. Finished piece 5" x 7."

This is a Tim Holtz inspired piece I made on Saturday.
The dress form was cut using corrugated cardboard. It was stained with distress stains. I didn't take my bird cage die but did take some die cuts. I used a yellow bird cage and then painted the cage with silver dabber paint.

 I used die cuts, tissue tape, scrapbook paper, distress stains, dabber paints, a stamp and other supplies in my stash.

Sunday, October 23, 2011

Grungy Monday Tim in 10

This tag was made in less than 10 minutes.
Love all the supplies from https://timholtz.com
While cutting the witch with my Silhouette I was inking and stamping the background. I used Tim's cling mounted stamps with two of Tim's new seasonal ink pads.

Wednesday, October 19, 2011

Mini Book


Sharing a page from my mini-book.
Each page was made using cardboard covered with cardstock.
The pages were made with Baroque die cuts. McGill Adjustable Paper Drill was used to cut holes in the pages.
Steampunk texture fades and Vintage distress inks was used on this page.
Stamp a vintage script to a piece of cardstock and then die cut one of Tim's Labels. It was enhanced with vintage distress ink.
Stamp the script on white cardstock and then adhered to grungeboard; then die-cut Tim's bird. Highlight the bird with several distress inks.
Crumble Tim Holtz Kraft paper and then die cut using Tim's flower die. I used three of the die cuts stacked up and then punched a hole in center and then attached a brad and bling to center of flower. A die cut key hole was made with thin black fun foam and then adhered to front.
A film strip with my Silhouette Digital Machine was cut with black paper.

Watercolor Card


It's been a long time since I made a card on white cardstock. I scanned this card before sending it to my mother. I didn't notice; it should have been scanned on something other than white.
This is a cling mount stamp and a word mounted quote from Hero Arts.
Paints from Lyra Watercolor
Border from TH On the Edge die.
Purple washi adhesive tape from Decor Tape
Metallic white paint in flower

Little Girl

The stamped images are from IBFS. The background was made with a CB embossing folder. Dragonfly punch was used on this card.

Tuesday, October 18, 2011

Burnt Brown Bag

My Technique Tuesday this week might be something you saw years ago on Aleene's Craft Show.
You can view Burnt Brown Bag over on OWSE blog:
http://craftingwithowse.blogspot.com/2011/10/burnt-brown-bag.html

or here on my blog using Aleene's technique:


Burnt Brown Bag

Welcome to Technique Tuesday! by Judy Cantrell 
My mother suggested that I share a technique seen
many years ago on Aleene’s Craft Show. 

Burnt Brown Bag
When Aleene shared this technique my mother and I made wall 
decorations with these leaves.
Instructions:
Begin by die cutting the leaves (Tatterered leaves)
using Kraft paper or brown grocery bags. 
You will need a set of two leaves for each leaf.
  Use a credit card to apply Aleene’s glue on inside of one leaf, cut a piece of 22 
gauge floral wire 3 3/4" long and place down center of leaf. 
Leave a small portion of the wire out from stem to use as a holder. 
Adhere the two leaves together. Let dry. 
    Apply (Aleene’s) glue with your finger over the front and back of leaf with a 
generous but even amount of glue with no paper showing. 
While the glue is still wet, light a white emergency candle with no scent 
in a well ventilated area if you are doing a lot of these at one time.
My suggestion: use exhaust fan in our bathroom for this technique. 
Use pliers to hold wire extending out of leaf in the flame until it is black in color.
It may take a few tries to get it right, bubbling glue is OK.
If you have done it correctly the glue will be set and will not come off. Place leaf back into the flame if you see spot of wet glue. 
When you are finished with the leaves wipe some of black soot off and then dry
brush color on each leaf. These leaves with last for years.
I used Viva Inka-Gold on my examples.
Years ago when Aleene did this technique she use Rub 'n Buff.
A gorgeous wreath or table decoration can be made using these leaves. 

Supplies for this technique:
Tattered Leaves  Die 
Aleene’s Glue (Brown bottle)
This technique works with this glue.
22 gauge floral wire
Paint 
Kraft paper or brown bag
Emergency candle with no scent


Thanks for viewing and have a nice day! 

Tuesday, October 11, 2011

Technique Tuesday over on OWSE


I added a new TT over on OWSE:
http://craftingwithowse.blogspot.com/2011/10/technique-tuesday-embossed-tiles-by.html

Look over on OWSE for more details.
portion of example

“Embossed Tiles”


  1. Apply light modeling paste to a piece of canvas.
  2. Apply a stamp into the paste while still wet, lift off and then clean stamp with an old toothbrush.

Note: adding the right pressure to the stamp takes practice.

  1. Allow this to dry.
  2. Wet the surface of the Light Modeling Paste piece with a paint brush.
  3. Start dropping transparent colors of paint onto the piece.  Bright color family works best for this technique. If you have enough water on the piece the colors will spread like magic to look like embossed tiles.  You will leave some areas light in color.
  4. Let this dry.
  5. Rewet the surface and then add gold iridescent paint to the white areas.
  6. Allow this to dry.
  7. Coat the surface with Clear Tar Gel using a palette knife and allow this to dry thoroughly.

I would love to hear your comments about this technique!


Sunday, October 2, 2011

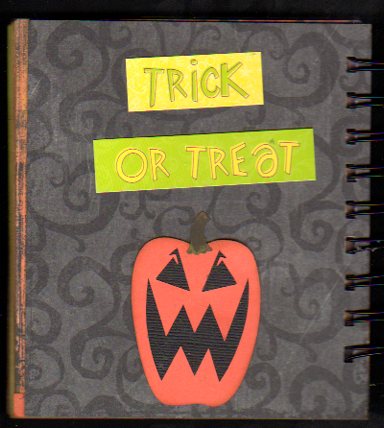
Halloween Mini Book


I used a few stamps, a Tim Holtz die cut on cover and the rest from Silhouette digital craft cutter. To shade and tint the scrapbook pages I used Tim Holtz Distress inks, The Paper Studio; Trick or Treat Sticker Pack with glitter. The book was put together with my Bind-it-All.
Finished book: 4 3/4" x 5.5."
Cover Page
The Townscape die is from Tim Holtz collection from "On the Edge"
First  page
2nd Page
Those are rubber stamped feet in the cauldron. I cut a slit in the pot and inserted the legs inside. The tiny skull is a stamped image as well. The green looking stuff in the pot was black just like the pot. It was painted with Adirondack Snow Cap Dabber Paint,  Adirondack Lettuce Dabber Paint and then distressed with Tim Holtz Distress inks.
3rd Page
 4th Page
I used Tim Holtz Distress Stickles in windows and on the pumpkin.
5th Page
Don't you just love this witch?
6th page
The eyes on the bat were made with Inkessentials Enamel Accents Dimensional Paint in White and Black. Looks so cute in real life.
7th half page
The mummy sticker is so cute. You can't tell from the photo but the mummy is covered with glitter.

8th half page
I know you are saying he should be white. Check back I have another one that is dancing.


9th page
10th page

11th page
12th page
This is another SS image, skeleton dancing with the ghost!
13th page
That's all the pages of my mini-book. I hope this inspires you to use your die cutting machines. I've had my Silhouette digital craft cutter since 2008.
The base of these books were made with something that would otherwise be tossed out to the trash. I used cereal boxes and then covered the pages with scrapbook paper.
Thanks for Looking!! 

Tuesday, September 27, 2011

Halloween Tag


The seam binding was inked with distress stains.
TH Alterations tree folder with distress ink pad in a circular pattern before running it through die cutting machine. Love the details from it.
The spiders were stamped with black ink, rock candy stickles on the body of spider.
Tag and pumpkins were ink and a foam applicator with distress ink was used to color.  

Friday, September 23, 2011

Published in Just Cards!!


I got a package in the mail today it's a copy of Just Cards! Volume 23 Fall 2011. It's a card I sent October 2009 and it's on page 30.
 

Sunday, September 18, 2011

Inspiration Showcase

Jennifer McGuire has wonderful online classes for those that paid a reasonable price of $19.00 for classes from September 12th through the 23rd.
I was making the heart pieces like Jennifer shares in the classes.
In mid-stream I changed from hearts to flowers.
I used my Silhouette Digital Craft Cutter to cut the flowers. The flower pattern was a free digital download for the class.

Day 7 Flower #16


Day 7 Flower #17
Day 7 Flower #18

Day 7 Flower #19


Day 7 Flower #20


Tuesday, September 13, 2011

Tutorial for Tag Booklet


I love to make handmade books.
The cover, spine and pages can be adapted

to make any size book. 

Making up these instructions are my own.


My daughter owns and operated an antique shop in Southern Kansas. 
When she has too much of one item she brings them
to me to use in my artwork.
This is how I came about using game boards for the base of
my books and Kraft paper for the covers. 


Supplies:
Distress ink (vintage photo)
Kraft paper
Rubber stamps
Archival ink (black)
Glossy Card stock
Zutter Bind-it-All
5/8” Owires
3M Spray Mount Artist’s Adhesive
White card stock or 14pt file folders
White 2" masking tape
Paper Trimmer
12” Tim Holtz ruler
Studio Multi-Medium 
 (adhesive)
Martha Stewart score board
Cutting Rotary Mat
Craft mat knife
Game board or heavy duty cardboard
This booklet was made for my #8 finished tags; 3 1/8” x 6 ¼.” 
Instructions:
1. Cut scrabble game board into two pieces down the center fold with a craft knife. Set one aside for another booklet. Each piece is now seven inches by fourteen inches long. Place one piece down on rotary mat. Use mat cutter with metal edge of ruler to cut front and back book pieces. I cut one piece from left finished seam and one piece from the right finished seam, and then the seam binding and spacers from remainer of game board. 
These measurements are:
2 pieces 4” x 7”
1 piece 1 & 1/4” x 7”
2 pieces of game board as spacer
Set aside for now
Note: For safety, please use a new blade when cutting the game board or thick book board.  
2. Cut a 10” x 14” piece of Kraft paper; crumble the paper with your hands (try not to tear the paper as you crumble,) smooth out, crumble several times and then smooth out. Spray one side of Kraft paper with adhesive outdoors or in well ventilated area. Leave outside for a little while, bring in and place down on craft table adhesive side up.
3. Place the pieces of game board down over the adhesive. Allow an even space between the front, back and spine using the spacer pieces. (As seen in photo)
4. Use scissors to cut all four outside corners on a diagonal.


5. Crease and fold all edges inward.


6. Measure and cut one piece of masking tape 2 inches by 7 inches, cover the inside of spine. Cut another piece of white masking tape 2 inches by 9 inches long, add to outside of spine and continue to inside of spine. Press down until smooth.

7. Cut two pieces of Kraft paper and glue on inside to cover up scrabble game board.
8. Use Vintage Photo distress ink direct to color the book cover and on the inside. Or finish as desired.

9. Use paper trimmer to cut two pieces of card stock 4 3/8” x 6 3/4.” This will be the inside front and back face cover.

10. Use Bind-it-All tool to punch 12 holes in these two pieces as directed on instructions.  

11. Next, use score board to crease a valley folds ¾” on front and back pieces. 

12. Cut 12-15 pages of card stock 3½” x 6 ¾”

13. Use the instructions from the Bind-it-All to punch hole into each page

14. Make a stack with one page (mountain fold) 4 3/8” x 6 ¾”, 15 cardstock pages 3 ½” x 6 ¾” and then one page (mountain fold) 4 3/8” x 6 ¾” together.

15. Use tool to cut 5/8” Owires 6 inches long. (12 wires)
16. With the stacked pieces of cardstock place them in the Bind-It-All and then bind together.  When you have the owires and paper together they will look like the photo below with valley fold of front and back pieces and pages in the middle.
Note: The ends of wires will not be seen they will be under the card stock next to spine.
17. Insert the pages in center of center spine.  Close the booklet and check that the Owires are at the center of booklet. Open carefully and glue one side at a time, and center the booklet with even spaces on both sides with valley folds at folds of spine. 
Note: Glue the inside front and back pieces with the valley folds in center of booklet, I used a credit card with Studio Multi- Medium as an adhesive. Smooth with Speelball 4" Baren until it is smooth and applied to book. (Rubbing with your hand will do as well to get a smooth finish)

18. Final step: Embellish your booklet! 

Have fun making your booklet!!

Comments Aprreciated!!

Tuesday, September 6, 2011

Embossed Frame


I would like to invite you to my Technique Tuesday over on http://craftingwithowse.blogspot.com/ 
to see how I made this card.

Comments Appreciated!!