Showing posts with label archival black ink. Show all posts

Wednesday, March 29, 2017

Sweet Memories

This page was simple to make for my Day 29 of the 30 day coloring challenge by Kathy Racoosin.
The background was made with my Gelli Printing Plate, acrylic paints and a stencil I made with .005 film and my Silhouette machine.  The cling rubber little girl stamped image was inked with archival black ink on manila card stock and then watercolored using a water brush. I inked and stamped two quote stamps and a scallop die cut from my stash to finish this page.

Friday, March 24, 2017

Mixed Media Mini Book Pg.1


I'm adding this page for Day 24 of the 30 day coloring challenge by Kathy Racoosin. 
I used Tim's collage medium to apply tissue wrap to cover page and then used a plastic spatula to apply a little gesso over the tissue wrap. 
Next, I added a little bit of distress crayons using my fingers to spread out and over the page. 
The little girls image is from Tim's new supplies called; Paper Dolls, these were purchased at JoAnn's. I added trimmed black card stock around the little girls. 
 "Today is the day" stamp and die set by Richard Garay purchased at Hobby Lobby.
Prima flowers, glitz, and a 4x8 inch Maya Road rectangular tabbed chipboard album was purchased at Tuesday Morning. 
All images were applied using collage medium purchased at Michael's. 

Tuesday, May 20, 2014

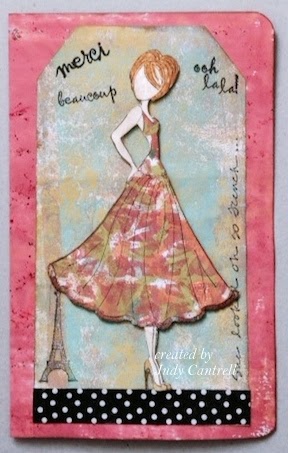
Merci

The pink portion of this card was made with Gelli printed paper.  Inside this card, another Gelli print. The dress on "Swing Dress" image was made with a Gelli printed paper. (the part with light color is actually silver paint) Love this paper! I've got enough to make one more dress. 
Behind the Julie Nutting stamped image is a tag made with a Gelli. (this was made with my brayer to remove extra paint) 
Prima stamps were inked to add to card front. Rounded corner was made with my Zutter tool. Smash dots paper tape was used to front on card. 


Friday, October 4, 2013

Happy Halloween


I had a lot of fun creating this piece using lots of Tim Holtz products.
I used die cuts, stamps and embossing folder on this piece. 
Love the TF embossed background it looks and feels like wood.

Wednesday, July 3, 2013

Red White and Blue


Happy 4th Everyone in America! 

This was one of the easiest pieces I've made in a long time. Adhere print to journal page, apply paint, stamp images, add gesso over the top with watermark stamp from 
Tim Holtz; Americana Silhouettes #122.
I forgot to add that I used masking tape to mask off some words on the stamp before inking and peeled it off before stamping on page. 

Tuesday, June 25, 2013

Embrace Imperfection


I've been working on this piece over two weeks. She was drawn freehanded and painted Whimsy Girl with watercolor crayons, watercolor pencils and acrylics.
A couple weeks ago Robyn gave a free online class to make Whimsy Girls. 

Thanks for Looking and Have a nice day! 


Wednesday, June 12, 2013

"Always" Tag


 Day 1 of sharing my tags using Dylusions 

I've been enjoying making tags again using Dylusions stamps and spray inks.
This 4 x 8" tag was made using several of Dyan's stamp sets. 

Monday, May 20, 2013

Steampunk Tin


Welcome to my blog this is my projects using Helmar and Viva Las VegaStamps! 


 Visit both blogs May 20-24th for new tips and tricks!


I was down with my Mother for the weekend, she opened a large tin with a can opener that left no sharp edges, instead of tin going into the recycle bin I used these fabulous products from Helmar and VLVS images to create this Steampunk Tin. 
To remove some of the shiny finish from the tin it was painted with a solution of vinegar and salt, after four days to dulling the tin, it was rinsed in water and dried. Miracle Tape was used to apply a trimmed piece of white card stock to fit around tin covering the ridges. Antiquing solution was applied to distress the tin and card stock. A couple days of drying outside due to the odor from the antiquing, it was dry brushed with Golden Teal acrylic paint. 
When paint was dry, an un-mounted image; Nesting Gears was used with Archival black ink to stamp around the tin and set aside to dry.


Stamp Men in Balloon BasketFlying Bird and Flying Man with black archival ink on copy paper. Color with distress markers. Cut-out. 

Using direction on Helmar Decoupage and Craft Paste container, apply a thin film of Decoupage Paste with craft brush where you want the trimmed images, add the images one at a time and then go over the top of image with thin film of Decoupage Paste again. Before the glue dries, remove the extra paste with white vinegar per instructions on container.
Note: glue dries fast, for best results do one image at a time. 
Set aside to dry.
Time Flies and Destination Unknown was added around tin using Archival black ink.
Inside and bottom of tin was painted with Golden Teal Acrylic paint. Set aside to dry.

Cover lid with a generous amount of Craft and Hobby PVA Glue, apply nylon three ply yarn in a spiral coil, leave a small hole in center, insert vintage wooden knob in glue, let dry. 

I'm very pleased with the results, the Decoupage and craft paste left a smooth finish across the surface. I've had a request to make one for my granddaughter, she wants to use it to hold matches on her mantle. 


Thanks for looking at this tutorial using the recycled tin. 

Have a nice day! 
Be sure to check out the other DT members projects and Helmar blog. 


Saturday, April 13, 2013

Steampunk ATC

Playing with an envelope die along with Viva Las VegaStamps! and Graphic 45. 
This is an ATC I made to fit inside the mini-envelope with the VLVS saying; Steampunk along with Graphic 45 Steampunk Debutante Collection. 


I'll share the mini-envelope bind it all book at a later time. 

Friday, January 25, 2013

Blast from the Past Blog Hop


I'm so excited to share what I made with the mounted antique lamp
along with feathered pen collage and blowing dandelion stamp.


VLVS supplies:


Trim white card stock 4" x 5 1/4."
Ink blowing dandelion image with shattered straw distress ink, stamp on white card stock to resemble wallpaper. Trim away a portion of wallpaper for a ceiling effect. Shadow edges of ceiling and corner with a pencil. 
A piece of manila card stock was cut to fit the card to resemble a tablecloth. 1/8" of Miracle tape was applied to May Arts ribbon, remove protective film and applied to the tablecloth to resemble fringe. Set aside.
Before gluing the tablecloth down, turn card upside down, stamp lamp base with archival black for table legs. Color with distress markers. Turn back around and then adhere manila tablecloth. Set aside. 
Stamp antique lamp and feathered pen collage with archival black ink on white card stock. While still wet pour ultra high gloss clear embossing powder on lamp, pour extra off and heat set to a high gloss finish. Cut both images out with sharp scissors. Use distress markers to color lamp and feathered pen collage. Use drawing pencil to add shadow on right of lamp and base of pen collage. Adhere lamp and collage to card front with gel medium. Apply Miracle tape to card front and adhere to green folded card to finish. 
=


=


Wednesday, January 9, 2013

Time Flies

On the 7th of January my tag tutorial was published on : http://vivalas.blogspot.com/

Here is a direct link to my tutorial using Viva Las VegaStamps! and supplies from my stash: http://vivalas.blogspot.com/2013/01/time-flies-tag.html


The stamps are from VLVS. Snowflake die by Tim Holtz.
Thanks for looking and have a nice day! 

Thursday, January 3, 2013

A Virtual Birthday Tag for Tim Holtz


Linda from Studio L3 ask us to make a virtual birthday for Tim Holtz...his birthday is January 7th!


I made this tag following the technique for "Stained" page 41 on Kraft Resist;  Compendium of Curiosities Vol. #2. 

All Tim Holtz products with the exception of three washers and trim. (seam binding)

Thanks Linda and Tim Holtz for all you have done to inspire me!

This tag was entered in Studio L3 challenge, Linda is giving away a monogramed apron signed by Tim and Mario plus extra goodies! 

Sunday, December 9, 2012

December 9th Tag

HO HO HO!! jolly old santa was inked on glossy card stock and then inked with Christmas distress ink, trim. The holly from same sheet of stamps was inked with memento bamboo leaves, cut out. Red distress marker was used to color berries.
My tag was made with blue and green alcohol inks on transparency. This piece was added to a white tag.
Glue n' Seal was used on this tag.


Saturday, December 8, 2012

December 8th Tag


I used vintage rickrack that was once white that has turned with age. All stamped images are from Viva Las VegaStamps! I used black archival ink to stamp all images and then used Tim's new distress Christmas inks to color the tag. The trim binding was inked with distress stain and added to the tag.

I hope everyone is enjoying seeing my tags!

Tuesday, October 16, 2012

Time Flies - ATC


As they say, Time Flies when you are having fun!
I was cutting up the diamond stamp on plate # 1428 within the hour they arrived at my door to make this tag.
The time flies and bicycle are from plate #893
 Stamps are from http://www.vlvstamps.com/
The background was made using Perfect Pearls and Palette Stamp and Stick Gluepad
 Archival Black ink pad was used on quote and bicycle.
 While still wet ultra high gloss embossing powder was used over the tag and heat embossed. Love the Look!
Note: a little bit of perfect pearls came off when I poured off the embossing powder. I didn't poured this portion back into the bottle, if I do this project again, I'll heat set before inking the images.

Thursday, October 11, 2012

CC2C#24 Alcohol Ink Resist

I finally had time to sit down today and play with this technique. The technique is on page 59 in Tim's Compendium of Curiosities volume 2 book.
I made my piece into an ATC using supplies I had in my stash along with the supplies Tim used on his technique.
I used glossy accents to apply the cardstock to the alcohol piece. Generally, I don't like to see the glossy accents showing but on this piece it's OK.
Thanks for Looking and have a nice day!

Thursday, October 4, 2012

CC2C#23


 This week's challenge is all about distress markers! Tim Holtz: A Compendium of Curiosities Vol.2 page 50.
I've been playing around with Distress Markers along with these new stamps.
As you can see, I love color!

Monday, August 20, 2012

No Rules Challenge ~ Spread my Wings

http://simonsaysstampandshow.blogspot.com/2012/08/challenge-no-rules.html Simon Says Stamp and Show is having a challenge with no rules. I love these rules,
I made this tag using several stamp sheets from Dyan Reaveley. I used the circle border, girl with big glasses, wings, hairpiece and words.
I used Memories Mist sprays to color the background. The circles on the right were made with a metal lid my DH was throwing away.  I used watercolor crayons to color the images. Stickles Patina was applied to the wing. Liquitex professional acrylic ink was splattered over the tag before applying the cut-out image.